Creating a professional presentation often involves much more than adding text to slides. You need to organize information, choose layouts, apply branding, find suitable visuals, and make sure the presentation tells a clear story. For many people, this process can take hours.
The Adobe Express Productivity Agent is designed to simplify much of that work. By combining artificial intelligence with Adobe Express’s design tools, it helps you generate presentation content, suggest layouts, and create visually consistent slides much faster than traditional methods.
In this guide, you’ll learn how to use the Productivity Agent to build presentations from idea to finished deck.
What Is the Productivity Agent?
The Productivity Agent is Adobe Express’s AI-powered assistant that helps automate creative workflows.
Instead of manually creating every slide, you can describe what you want to present, and the Productivity Agent can assist by generating:
- Presentation outlines
- Slide layouts
- Headlines
- Supporting text
- Graphics
- Icons
- Visual recommendations
Rather than replacing your expertise, it helps you build presentations more efficiently.
Why Use the Productivity Agent for Presentations?
Building presentations involves many repetitive tasks.
Examples include:
- Formatting slides
- Aligning objects
- Choosing colors
- Creating consistent typography
- Finding illustrations
- Resizing graphics
The Productivity Agent reduces much of this manual work, allowing you to focus on the message you’re trying to communicate.
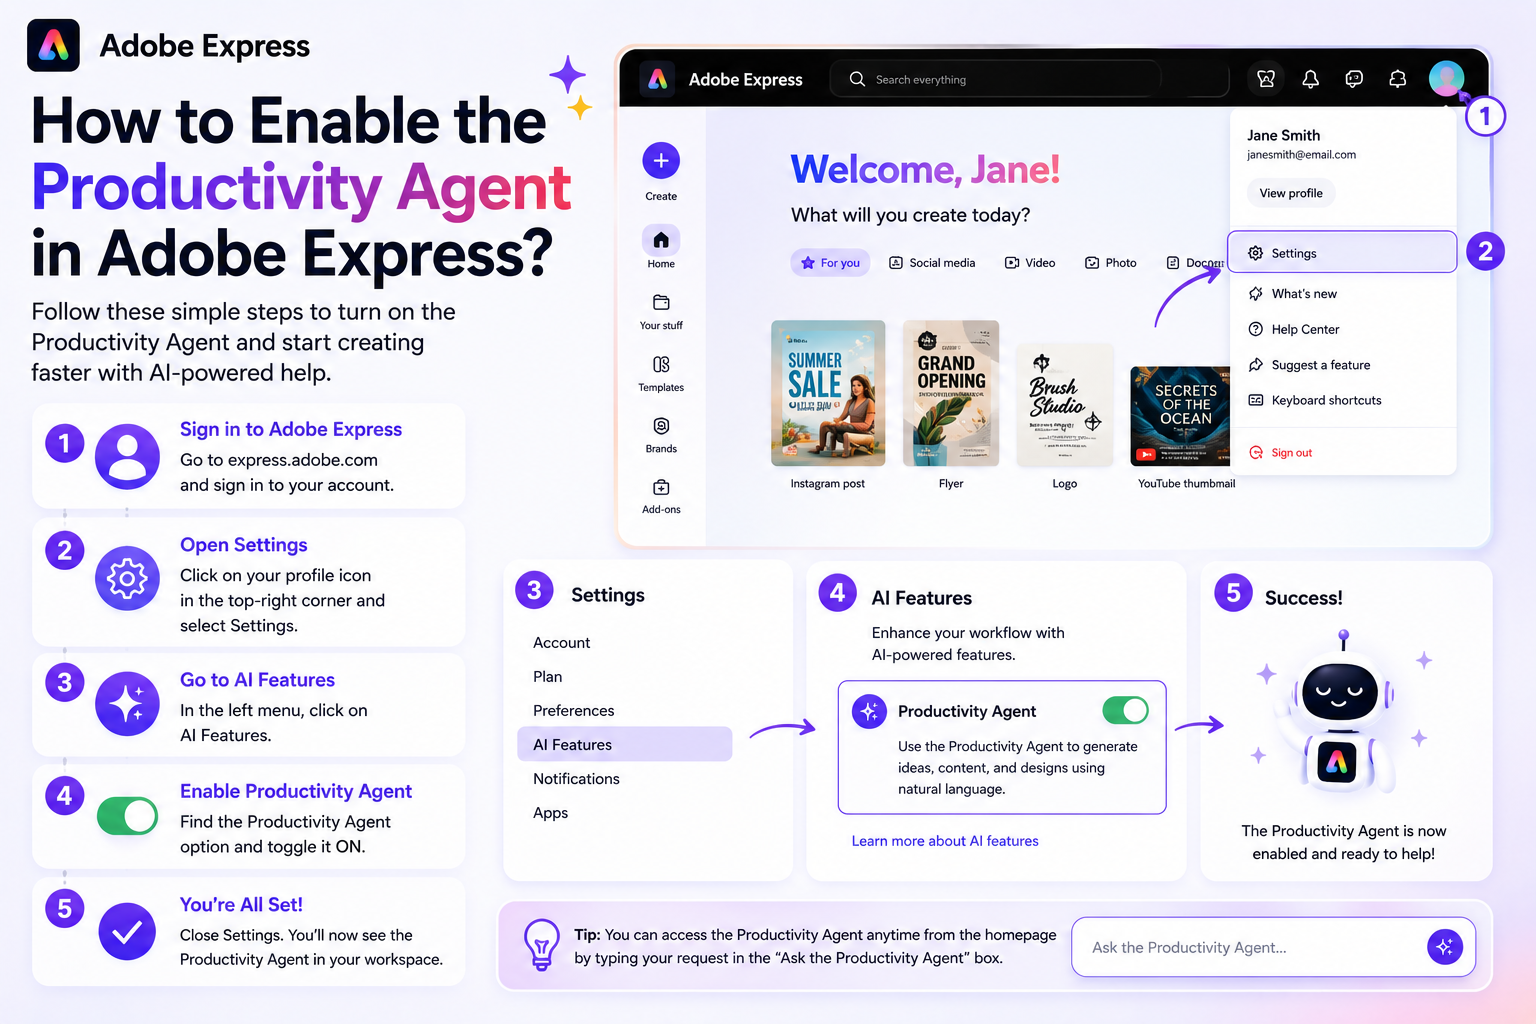
Step 1: Start a New Presentation
Open Adobe Express and create a new presentation.
You can either:
- Choose a blank presentation
- Start from a template
- Use an existing presentation
Once your project is open, you can begin working with AI-assisted tools.
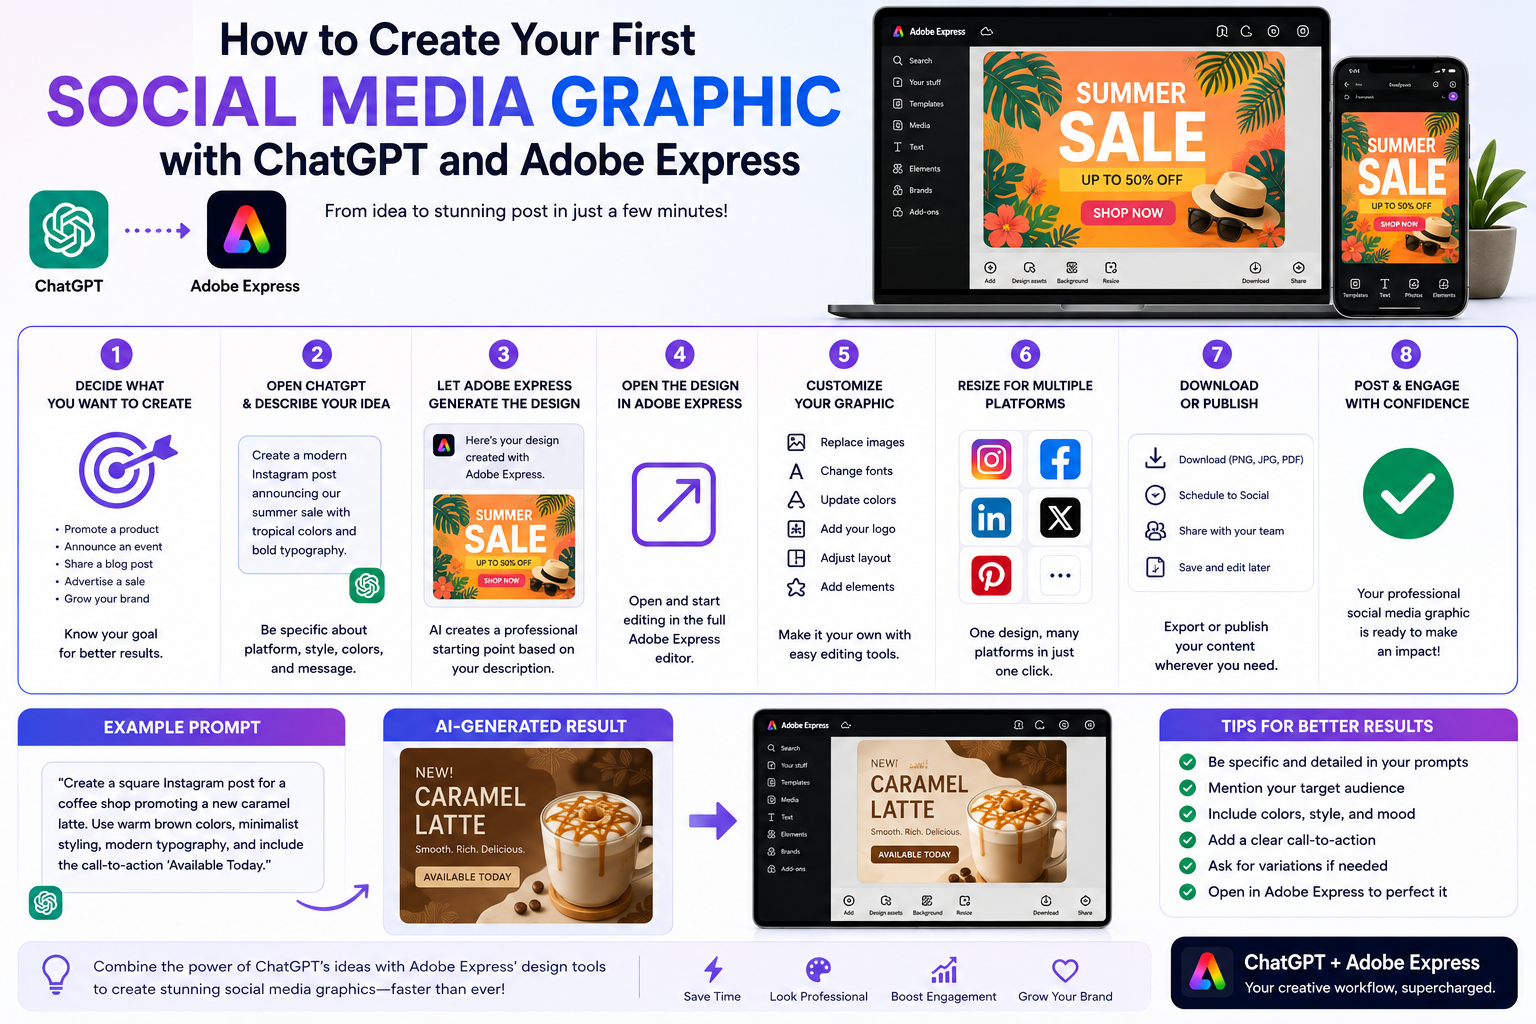
Step 2: Describe Your Presentation
Instead of designing every slide manually, tell the Productivity Agent what you want to create.
Examples include:
- Create a presentation introducing our new software product.
- Build a sales presentation for small businesses.
- Design an investor pitch deck.
- Create training slides about cybersecurity awareness.
- Generate a presentation explaining our marketing strategy.
The more detailed your request, the better the generated suggestions will be.
Step 3: Generate an Outline
Every good presentation starts with a logical structure.
Ask the Productivity Agent to create an outline.
For example:
Create a 10-slide presentation introducing our new AI product.
A suggested outline might include:
- Title Slide
- Introduction
- The Problem
- Our Solution
- Key Features
- Benefits
- Customer Success Stories
- Pricing
- Next Steps
- Questions
Starting with an outline saves considerable planning time.
Step 4: Create Slide Content
Once the outline is ready, generate content for each slide.
The Productivity Agent can help produce:
- Headlines
- Bullet points
- Short summaries
- Supporting descriptions
- Calls-to-action
Remember to review and personalize all generated content before presenting it.
Step 5: Apply Your Brand Identity
Professional presentations should reflect your organization’s branding.
Use your Brand Kit to automatically apply:
- Company logo
- Brand colors
- Corporate fonts
- Approved visual elements
Consistent branding helps create a polished and professional presentation.
Step 6: Add Visual Elements
Strong presentations rely on visuals as much as text.
The Productivity Agent can assist with:
- Icons
- Illustrations
- Photos
- Background graphics
- Decorative elements
Aim for visuals that reinforce your message rather than distract from it.
Step 7: Keep Slides Simple
One common mistake is placing too much information on a single slide.
The Productivity Agent may suggest cleaner layouts that improve readability.
As a general rule:
- One main idea per slide
- Short bullet points
- Large headings
- Plenty of white space
Simple slides are easier for audiences to understand.
Step 8: Create Supporting Graphics
Presentations often require diagrams and visual summaries.
The Productivity Agent can help create:
- Comparison graphics
- Process diagrams
- Timelines
- Feature lists
- Marketing visuals
- Product showcases
These graphics make complex information easier to understand.
Step 9: Generate Alternative Layouts
If a slide doesn’t feel quite right, ask the Productivity Agent for alternatives.
For example:
Show another layout.
Or:
Create a more modern version.
Seeing multiple options often helps you find a stronger design.
Step 10: Review Before Presenting
Before sharing your presentation, check:
- Grammar
- Spelling
- Data accuracy
- Branding consistency
- Image quality
- Slide order
- Alignment
- Animations
Even AI-generated presentations benefit from a final human review.
Presentation Ideas
The Productivity Agent works well for many presentation types, including:
Business Presentations
- Company overviews
- Quarterly reports
- Sales presentations
Educational Presentations
- Classroom lessons
- Workshops
- Online courses
Marketing Presentations
- Product launches
- Campaign strategies
- Brand proposals
Startup Pitch Decks
- Investor presentations
- Business plans
- Funding proposals
Internal Communications
- Team meetings
- HR updates
- Company announcements
Tips for Better AI Prompts
Instead of writing:
Create a presentation.
Try something more specific:
Create a 12-slide presentation introducing a cloud cybersecurity platform for enterprise IT managers using a modern blue corporate design.
The additional context usually produces more relevant results.
Common Mistakes to Avoid
Overloading Slides
Too much text reduces audience engagement.
Ignoring Branding
Always apply your Brand Kit before finalizing the presentation.
Accepting the First Draft
Generate several versions before selecting the final design.
Skipping Visuals
Images and icons help audiences remember information.
Not Practicing
A well-designed presentation still requires a confident presenter.
Who Should Use the Productivity Agent?
This workflow is ideal for:
- Business professionals
- Marketing teams
- Educators
- Consultants
- Entrepreneurs
- Students
- Trainers
- Sales professionals
Anyone who regularly creates presentations can save significant time.
Final Thoughts
The Adobe Express Productivity Agent makes presentation creation faster by combining artificial intelligence with intuitive design tools. Instead of spending hours arranging slides, writing headlines, and searching for graphics, you can use AI to generate a strong starting point and then refine it to match your goals.
Whether you’re preparing an investor pitch, a classroom lesson, a product launch, or an internal business meeting, the Productivity Agent helps streamline the process while maintaining a professional appearance. As Adobe continues expanding its AI capabilities, presentation design is becoming more efficient, allowing you to focus on delivering your message rather than building every slide from scratch.